Sunday, April 24, 2022

OSGi Bundle States in AEM

OSGi is a fundamental element in the technology stack of AEM. It is used to control the composite bundles of AEM and their configuration. OSGi “provides the standardized primitives that allow applications to be constructed from small, reusable and collaborative components.

OSGi

OSGi is a Java framework for developing and deploying modular software programs and libraries. OSGi has two parts.

  •     Bundles or Plug-in
  •     Java Virtual Machine (JVM)-level service registry.

In this article, we will focus on bundle states only.

A Bundle object is the access point to define the lifecycle of an installed bundle. Each bundle installed in the OSGi environment must have an associated Bundle object.

A bundle must have a unique identity, a long, chosen by the Framework. This identity must not change during the lifecycle of a bundle, even when the bundle is updated. Uninstalling and then reinstalling the bundle must create a new unique identity.

A bundle can be in one of six states:


Name

Value

Description

UNINSTALLED

0x00000001

Only visible after a bundle is uninstalled; the bundle is in an unusable state but references to the bundle object may still be available and used for introspection.

INSTALLED

0x00000002

Visible if the bundle’s code dependencies are not resolved. The Framework may attempt to resolve an INSTALLED bundle’s code dependencies and move the bundle to the RESOLVED state.

RESOLVED

0x00000004

The Framework has successfully resolved the bundle’s code dependencies, but the bundle is not active. Dependencies include: the bundle’s classpath; the bundle’s package dependencies; the bundle’s required bundle dependencies;

STARTING

 0x00000008

The bundle’s start method is active. A bundle must be in this state when the bundle’s BundleActivator.start(BundleContext) is called. If the BundleActivator.start method completes without exception, then the bundle has successfully started and must move to the ACTIVE state.

STOPPING

0x00000010

The bundle’s stop method is active. A bundle must be in this state when the bundle’s BundleActivator.stop(BundleContext) method is called. When the BundleActivator.stop method completes the bundle is stopped and must move to the RESOLVED state.

ACTIVE

0x00000020

The bundle has been successfully started and activated.


OSGi bundle lifecycle


References:

https://docs.osgi.org/javadoc/r6/core/org/osgi/framework/Bundle.html

Saturday, April 23, 2022

Difference- EAR, JAR and WAR

J2EE defines three types of archives:

  • EAR
  • WAR
  • JAR

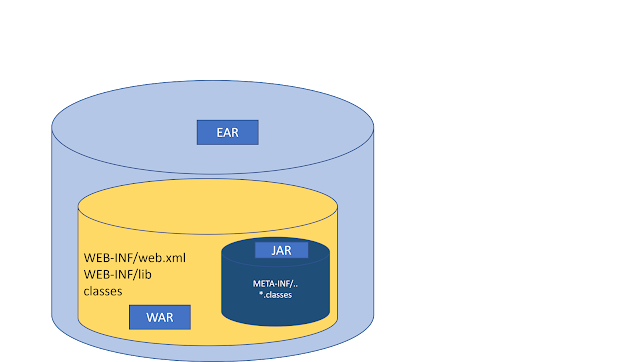
When Java applications are deployed, all of the files that constitute the Java app are compressed and packaged into a single file. While compressed files are typically given a .zip extension, the Java community instead uses .ear, .war and .jar files.


Under the hood, EAR, JAR and WAR files are all simply zip files that contain the various images, XML files, property files and pieces of Java code that make up a Java application.

EAR WAR JAR Difference


  • Java Archive (JAR) A JAR file encapsulates one or more Java classes, a manifest, and a descriptor. It also holds generic libraries of Java classes, resources, auxiliary files.  
  •  JAR files are the lowest level of archive. JAR files are used in J2EE for packaging EJBs and client-side Java Applications.
  • Actually, jar file contains all the .class files of our java project.

Extension- .jar

  • Web Archive (WAR) A WAR files are similar to JAR files, except that they are specifically for web applications made from Servlets, JSPs, and supporting classes. These are intended to contain complete Web applicationsWeb application contain all the web related Technologies like Html,Css, Javascript , Jsp,Servlet ,Xml etc and War file is a compressed form of web application which allows us to make that application portable. Struts and Spring based Web applications may be archived to a WAR.

·                       Extension- .war

  • Enterprise Archive (EAR) An EAR file contains all of the components that make up a particular J2EE application. are intended to contain complete enterprise applications. In this context, an enterprise application is defined as a collection of .jar files, resources, classes, and multiple Web applications. An EAR may contain one or more WAR files. EAR files can also contain connector modules packaged as RAR files and Client modules packaged as JAR files.

·                          Extension- .ear

   Summary: 


     An EAR file requires a fully Java Platform, Enterprise Edition (Java EE)- or Jakarta Enterprise Edition (EE)-compliant application serversuch as WebSphere or JBoss, to run. 

A WAR file only requires a Java EE Web Profile-compliant application server to run.

A JAR file only requires a Java installation. 


Tuesday, December 28, 2021

CIF Add-on with AEM


In this post we will discuss how to setup the AEM with CIF add-on.

 Prerequisites:

Some of the prerequisites for the setup are :

1. AEM as a Cloud Service SDK

2. Java 11

3. Node.js

4. npm

5. CIF-Add On far file


Step-1 Follow this blog to setup AEM instance on local. 

https://codingwithtea.blogspot.com/2021/08/aem-local-set-up.html

Step-2 CIF Add-on

Latest CIF add-on should be downloaded from the Software Distribution portal. It is a zip file which contains the respective far file as add-ons for author and publish instance.

  • Make sure you have the latest AEM as a cloud service SDK. Follow #1.
  • Stop AEM running instance.
  • Once the quickstart folder has been created , go inside it and create a folder named install.


  • Unzip the CIF add-on package file and copy the correct .far file in the install folder of the relative instance you are planning to run i.e. author .far file for author-4502 instance and publish .far for publish-4503 .


  • Start AEM instance.
Login author AEM SDK and verify the CIF add-on related bundles 


You will also be able to see the additional Commerce tab in http://localhost:4502/aem/start.html


Similarly, setup for publish instance.

Friday, October 1, 2021

AEM Dispatcher Setup Using Docker - Windows


Dispatcher Setup


The AEM as a Cloud Service SDK includes the recommended Dispatcher Tools version, that facilitates configuring, validating, and simulating Dispatcher locally. Dispatcher Tools is comprised of:

  • a baseline set of Apache HTTP Web server and Dispatcher configuration files, located in .../dispatcher-sdk-x.x.x/src
  • a configuration validator CLI tool, located at .../dispatcher-sdk-x.x.x/bin/validate (Dispatcher SDK 2.0.29+)
  • a configuration generation CLI tool, located at .../dispatcher-sdk-x.x.x/bin/validator
  • a configuration deployment CLI tool, located at .../dispatcher-sdk-x.x.x/bin/docker_run
  • a Docker image that runs Apache HTTP Web server with the Dispatcher module

Prerequisites:

  1. Windows users must use Windows 10 Professional.
  2. Install Experience Manager Publish Quickstart Jar on the local develop machine. Please refer local set-up.
  3. Install and start the latest version of Docker (Docker Desktop 2.2.0.5+ / Docker Engine v19.03.9+) on the local development machine.

Dispatcher Set-Up

 Dispatcher tools comes along with aem-sdk. Extract this zip file.


In the extracted folder, there is aem-sdk-dispacther-tools-x.x.xx-windows.zip. Extract this zip in some folder, you can see below structure.


src folder contains below folders:


Configuration Structure:


./

── conf.d

   ── available_vhosts

      └── default.vhost

   ── dispatcher_vhost.conf

   ── enabled_vhosts

      ── README

      └── default.vhost -> ../available_vhosts/default.vhost

   └── rewrites

      ── default_rewrite.rules

      └── rewrite.rules

   └── variables

|       ── custom.vars

       └── global.vars

└── conf.dispatcher.d

    ── available_farms

       └── default.farm

    ── cache

       ── default_invalidate.any

       ── default_rules.any

       └── rules.any

    ── clientheaders

       ── clientheaders.any

       └── default_clientheaders.any

    ── dispatcher.any

    ── enabled_farms

       ── README

       └── default.farm -> ../available_farms/default.farm

    ── filters

       ── default_filters.any

       └── filters.any

    ── renders

       └── default_renders.any

    └── virtualhosts

        ── default_virtualhosts.any

        └── virtualhosts.any


docs folder:


bin folder:


The bin subdirectory also contains a docker image and a shell script to execute that will use your deployment information and run an Apache and dispatcher in a docker container. It also contains a validator binary for macOS and Linux.


Local development and testing

Start publish instance and docker desktop first.


Step 1: Validate the Dispatcher configuration contained in this SDK

On Windows, go to dispatcher folder and run below command

> bin\validator full -d out src


This validates the configuration and generates deployment information in out.

Out folder is created in folder:


Step 2: Validate the deployment information by the Dispatcher in a docker image.

Run below command:

bin\docker_run out host.docker.internal:4503 8080


host.docker.internal is pointing to localhost.


Open any page in publish instance:

index page


Open same url on port 8080 as we started docker on this port 8080.


Dispatcher is working and we can access our publish instance pages on dispatcher.

Project Dispatcher’s code testing:

Step-1: Delete out folder from dispatcher’s folder.


Step-2: Now run below command to deploy project’s specific dispatcher configurations:

Let's add one rule in rewrite file.

rewrite.rules

custom.var file


bin\validator full -d out <loctaion>/dispatcher/src


out folder is created in the same folder:


Open any file to check your configurations. Let’s say I opened file “rewrite_rules” and you can see project specific configs are deployed successfully.


Step-3: Run below command

bin\docker_run out host.docker.internal:4503 8080

With your AEM publish server running on your system, listening on port 4503, you can start the dispatcher in front of that server as follows:


In rewrite file there is rule

RewriteRule ^/?$ /content/${CONTENT_FOLDER_NAME}/us/en.html [PT,L]

Now open browser and run http://localhost:8080/

dispatcher index page


Dispatcher is setup now.

Install yarn on windows

 In this article, we will see how we can install yarn on windows. First lets understand what yarn is? Yarn is an established open-source pac...