ACL available options:
- ignore
- overwrite
- merge
- merge_preserve
- clear
By default acls are installed in overwrite mode.
You can add any of the option in pom file. Below is the code for "merge" ACL option via pom:

It is a systematic process of spotting and fixing
the number of bugs, or defects, in a piece of software so that the software is
behaving as expected.
Debugging refers
to identifying, analyzing, and removing errors. It is considered to be an
extremely complex and tedious task because errors need to be resolved at all
stages of debugging.
When we work in IDE then we need to debug code to find or check what data is capturing.
We normally work on IntelliJ or Eclipse in the AEM project.
There are multiple ways to start AEM in debug mode.
Start AEM with this JVM parameter
-agentlib:jdwp=transport=dt_socket,address=8000,server=y,suspend=n
java -jar directly.java -Xmx512m -agentlib:jdwp=transport=dt_socket,address=30303,server=y,suspend=n -jar cq-author-4502.jarAnother way to start AEM in debug mode, do changes in start.bat file for windows.
For Windows Users
You can see line content is:
if not defined CQ_JVM_OPTS set CQ_JVM_OPTS=-Xmx1024m -XX:MaxPermSize=256M -Djava.awt.headless=true
Append below content to end of this line #25
You can see line content is:
if not defined CQ_JVM_OPTS set CQ_JVM_OPTS=-Xmx1024m -XX:MaxPermSize=256M -Djava.awt.headless=true
Append below content to end of this line #25
if not defined CQ_JVM_OPTS set CQ_JVM_OPTS=-Xmx1024m -XX:MaxPermSize=256M -Djava.awt.headless=true -debug -Xnoagent -Djava.compiler=NONE -Xrunjdwp:transport=dt_socket,server=y,suspend=n,address=30303-z means zero length. for example, if [ -z "$CQ_JVM_OPTS" ]; then means if $CQ_JVM_OPTS is empty. if [ -z "$CQ_JVM_OPTS" ]; then
CQ_JVM_OPTS='-server -Xmx2048m -XX:MaxPermSize=256M -Djava.awt.headless=true -agentlib:jdwp=transport=dt_socket,address=30303,server=y,suspend=n'
...
fi
After that below pop-up will appear

Click Edit Configurations.
The below screen will appear on clicking "Edit configurations".

Click "+" to add a new configuration. Select "Remote"


if not defined CQ_JVM_OPTS set CQ_JVM_OPTS=-Xmx1024m -XX:MaxPermSize=256M -Djava.awt.headless=true -debug -Xnoagent -Djava.compiler=NONE -Xrunjdwp:transport=dt_socket,server=y,suspend=n,address=30303

Major features:
Setup the Solr Server
Step 1: To install Solr server, you need to have Java 1.8 installed.
Step 2: Download and install the Solr server (solr-6.2.0.zip ) from the following URL:
http://archive.apache.org/dist/lucene/solr/

Step 3: Unzip the zip file.
Step 4: After unzipping file structure of solr seems like

Step 5: Go to the bin folder and run the below command to start the Solr server.
solr start -e cloud -noprompt

Step 6: Once the server starts, you will see the message in the command prompt. Solr is started on 8983 port.
Step 7: Open the browser and verify the URL
http://localhost:8983/solr/#/

You can see solr web client.
Step 8: Download the code from GitHub. Unzip it some directory. You can directly clone this project. Follow below command:
git clone https://github.com/heenamadan/AemSolr2.git
Step 9: Go to the AemSolr2 folder and run below the maven command to deploy code.

Step 10: Now go to solr web client and create a collection:
This collection is for a single search index. Follow the below steps to create an index in solr.
From the web client, select Collection

Click Add Collection

provide the name of the collection "collection".
Choose the config list from dropdown. I am using gettingstarted.
You can provide a shard number according to your requirement. I am keeping it 1 at this moment.
You can provide a replication factor. By default, it is 1.

Click add a collection. You can see the collection is created.

There are a lot of options available like you can delete collection by clicking the "Delete" button or you can also create an alias. We are just creating collection as part of this article.
We are done at solr side. Now we will do some configurations at the AEM side.
Step 11: Configure AEM to Solr:
1) Search for "AEM Solr Search - Solr Configuration" service and enter the following values:
Protocol: http
Solr Server Name: localhost
Solr Server Port: 8983 (port number of your solr web client)
Solr Core Name: collection ( references the collection you created)
Content page path: /content/AemSolr2

Note: Provided code base(download from Github) has a content site structure under AemSolr2. You can provide any site structure path here for indexing.
2) Search "Oak Solr remote" in configuration and check solr details. Check the port number of solr in the Solr HTTP URL. The rest is fine. Click Save.

3) Search "oak solr server provider" and select remote solr from the drop-down.
As our Solr is installed separately, It is not embedded so select "Remote Solr"

Now we are good to go!
Now create an index in Solr. For this, we have IndexContentToSolr java servlet which makes a connection to solr and creates an index.
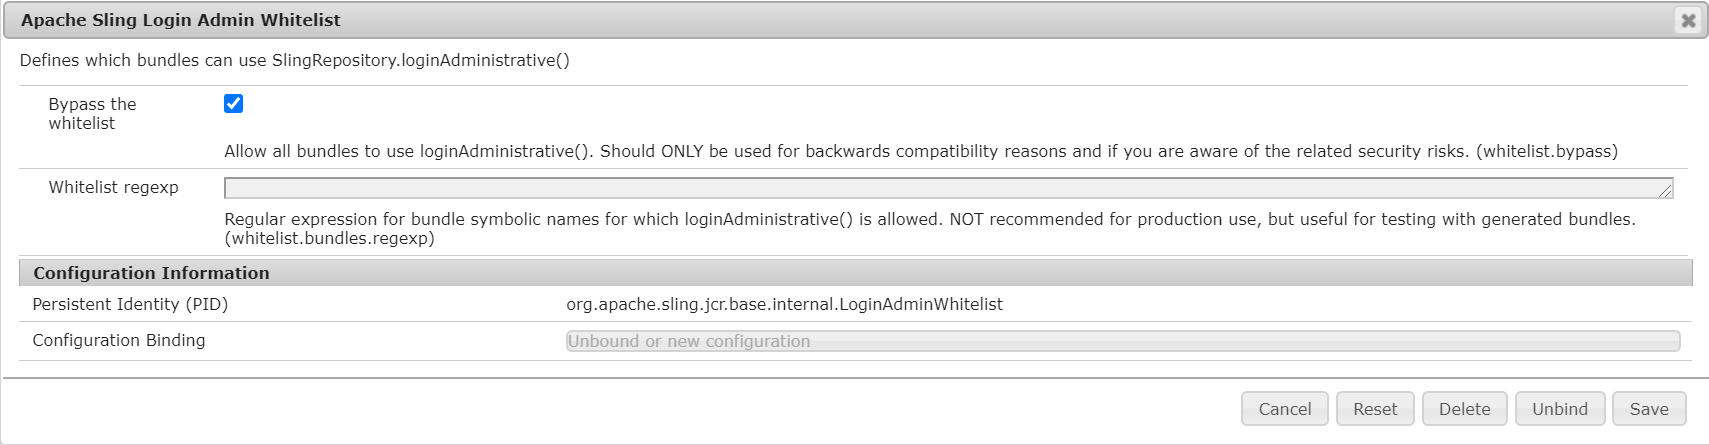
For code brevity, this code example uses repository.loginAdministrative(null) method. This is used simply to keep the code shorter. If you are using this in Production, the recommended way is to create a system user and use the Sling Mapping Service. In order to run this example without creating system user, you can whitelist this call. It is not recommanded to use this. Please create appropriate system user and use sling mapping.

Click the "Index Pages" button. The default value is already populated to the text field which is "indexpages". Pages are successfully indexed.
Response Message: "Response is successfully indexed pages to solr server".
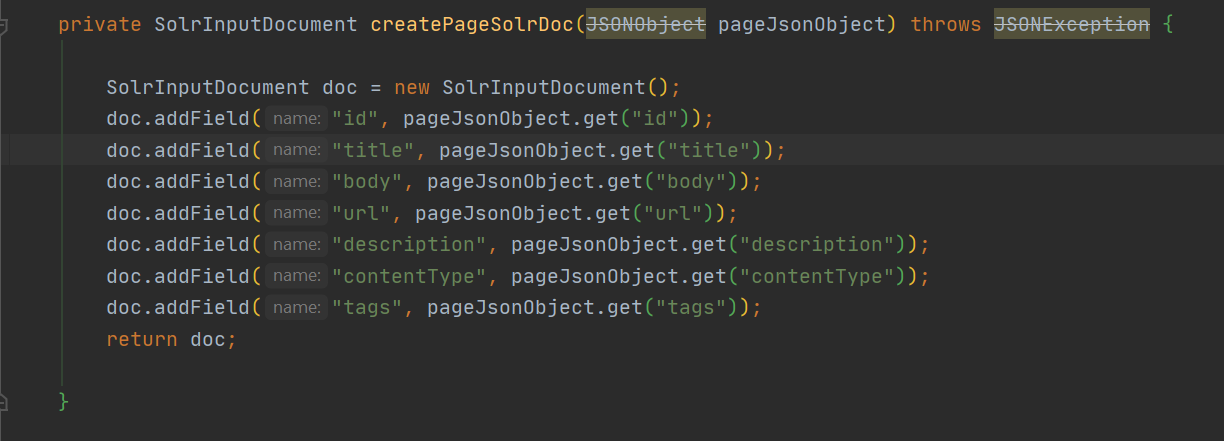
Index creation is done on the properties that you specified in your java file. For example, we did on below properties only. It will do indexing on id, title, etc. properties that we have added to create an index if present in page properties.
Check solr web client to check indexes. Click collection Selection drop down from the left panel and select your collection name. In our case, it is "collection"

Now Select Query from the left panel and click execute a query.

All indexed pages appear as a result.

You can see the results. We have 3 pages and all got indexed with properties on which we have applied indexing.

Or you can check by directly going through this link and click execute the query.
View Solr results in AEM
In the codebase, we have a component named "solrsearch". Go to /apps/AemSolr2/components/content/solrsearch to see component details.
Add below lines on top of the HTML file of /apps/AemSolr2/components/content/solrsearch/solrsearch.html
<script src="https://code.jquery.com/jquery-3.1.0.js" integrity="sha256-slogkvB1K3VOkzAI8QITxV3VzpOnkeNVsKvtkYLMjfk=" crossorigin="anonymous"></script>
I have already added this line to my component.
Now open any page for eg. http://localhost:4502/editor.html/content/AemSolr2/en.html. Click to drag component. You will see the "+" icon to add a component.


Now search with the title of the page. for eg: "heena"
Below is the result.

Search with "Francais" below is the result.

Now I am searching with id-"en". It shows the result.

Now I am trying with a random string that is not indexed.

Congratulations!!
Search is working in AEM with apache solr.👍
You can search in apache solr to check the result is the same as AEM search or not.
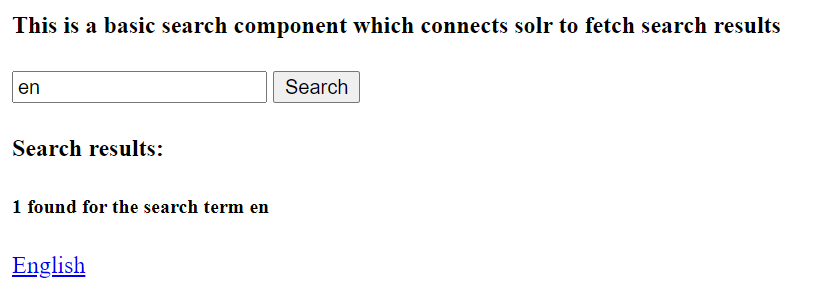
Go to solr web client and in the query enter title/id etc. on which you want to apply search and click execute the search. Let's search for "English" and the only title which has "English" keyword has appeared as a result.
Enter "English" in q place which is query string place.

You can delete the index that you have created earlier. Click "Delete index" to the component and you are done.

Index Deleted in Solr web server.

Stop the Solr server. Go to the bin folder of Solr and Run solr stop -all command.

Set up Dispatcher in AEM on Windows
What is Dispatcher?
Dispatcher is Adobe
Experience Manager's caching and/or load balancing tool. Dispatcher also helps
to protect your AEM server from attack.
The Dispatcher
helps realize an environment i.e. both fast and dynamic. It works as a part of
a static HTML server, with the aim of:
Download Apache
server from the trusted Apache site. Follow below link:
http://archive.apache.org/dist/httpd/binaries/win32/
A lot of new versions are available for Apache. I am using apache server 2.2. Follow the below steps to set up on windows:
Step 1: Download

Step 2: Double click the downloaded msi file and click
next and finish

By default, it will install at C:\Program Files
(x86)\Apache Software Foundation\Apache2.2
 |
| Apache location |
Step 3: Go to your httpd.conf file C:\Program Files (x86)\Apache Software Foundation\Apache2.2\conf
· Change default Define SRVROOT or ServerRoot path to absolute path of your apache2.2 folder “ C:\Program Files (x86)\Apache Software Foundation\Apache2.2\conf” (Line – 38).
· Update listen port Listen 8080 (Line – 47), it is optional if you don’t want to change you can keep default port as 80.
· Update ServerName localhost:8080 (Line – 173), it is optional if you don’t want to change you can keep default port as 80.
· Now Go to the bin folder (C:\Program Files (x86)\Apache Software Foundation\Apache2.2\bin) and open command prompt.
· run httpd -k start to start the server.
#Common Issue while starting the server
If it says the port is already bound to 80 port on 0.0.0.1:80 then change port in httpd.conf file.
Then change the port. Let’s say I am changing to port 81. Change port at line #47 and save it.
Step 4: Run httpd -k start command to start the apache server.
Check error.log in the logs folder of C:\Program Files (x86)\Apache Software
Foundation\Apache2.2\logs.
If no error then opens a browser and
type localhost. It shows it works!

You can change this content. For this:

· Download dispatcher
build
· Modify Apache web
server httpd.conf file
· Modify
dispatcher.any file
· Restart Apache web
server and you are done.
Go to below link:
https://www.adobeaemcloud.com/content/companies/public/adobe/dispatcher/dispatcher.html

Download the selected file. I am selecting no ssl.
Unzip dispatcher-apache2.2-windows-x86-4.2.3.zip
file
Note# Its better to use the same version for both dispatcher and apache. I am using 2.2 for both. if you are working with 2.4 apache and 2.2 dispatcher then you might face some issue.

It contains below files:
§ disp_apache2.2.dll – This is my
dispatcher module file, which we will plugin with web server.
§ dispatcher.any – It is our dispatcher configuration file.
§ author_dispatcher.any – Sample file for configuring our dispatcher.
§ httpd.conf.disp2.conf – sample file
to configure apache webserver.
I am pasting line #130 where my load modules are ending.

Note:-This setting is used by apache webserver to load my dispatcher
when next time Apache web server is started
Copy line #236-248 from httpd.conf.disp2.conf file and paste it to httpd.conf file after
ending of </IfModule>.
Below are the lines, you can use it directly.
# location of the configuration file. eg:
'conf/dispatcher.any'
DispatcherConfig conf/dispatcher.any
# location of the dispatcher log file. eg:
'logs/dispatcher.log'
DispatcherLog logs/dispatcher.log
# log level for the dispatcher log, can be
either specified
# as a string or an integer (in
parentheses)
# error(0): Errors
# warn(1):
Warnings
# info(2):
Infos
# debug(3): Debug
# trace(4): Trace
DispatcherLogLevel warn
# if turned on, the dispatcher looks like a
normal module
DispatcherNoServerHeader Off
# if turned on, request to / are not
handled by the dispatcher
# use the mod_alias then for the correct
mapping
DispatcherDeclineRoot Off
# if turned on, the dispatcher uses the URL
already processed
# by handlers preceeding the dispatcher
(i.e. mod_rewrite)
# instead of the original one passed to the
web server.
DispatcherUseProcessedURL Off
# if turned to 1, the dispatcher does not
spool an error
# response to the client (where the status
code is greater
# or equal than 400), but passes the status
code to
# Apache, which e.g. allows an
ErrorDocument directive
# to process such a status code.
#
# Additionally, one can specify the status
code ranges that should
# be left to web server to handle, e.g.
#
# DispatcherPassError 400-404,501
DispatcherPassError 0
#
# DispatcherKeepAliveTimeout specifies the
number of seconds a
# connection to a backend should be kept
alive. If not set or
# set to zero, connections are not kept
alive.
#
#DispatcherKeepAliveTimeout 60
</IfModule>
It contains below entries:
·
DispatcherConfig – location of the configuration
file
· DispatcherLog– location of the dispatcher log file
· DispatcherPassError – to use your
dispatcher for handling errors, if set to 1 then webserver will handle errors.
·
DispatcherKeepAliveTimeout – Time
interval for which your request should be kept alive.
Now copy the dispatcher handler from httpd.conf.disp2.conf (line #370) to httpd.conf file(line #238). this will override the default handle of web server and allow the dispatcher to entertain all incoming requests.
Add below code:
<IfModule disp_apache2.c>
ModMimeUsePathInfo On
# enable dispatcher for ALL request. if this is too restrictive,
# move it to another location
SetHandler dispatcher-handler
</IfModule>
Options FollowSymLinks
AllowOverride None
</Directory>
Copy this disp_apache2.2.dll file from downloaded
dispatcher and paste it under C:\Program Files (x86)\Apache
Software Foundation\Apache2.2\modules.
Copy dispatcher.any file from downloaded
dispatcher and paste it under C:\Program Files (x86)\Apache
Software Foundation\Apache2.2\conf directory.


§ For Publish the instance you should deny all request and allow specific, For an author instance you should allow all and deny specific.
§ Update cache Doc
Root. It should exactly match my httpd.conf Documentroot path. Copy Document
root path from httpd.conf file and paste it in dispatcher.any file at line 132.

§ Save all settings
and Restart your Apache Web server.
httpd -k start
To test whether the dispatcher is configured properly or not. Check logs in your
directory. You will find dispacther.log in the logs folder

Now open localhost:81 to your browser.
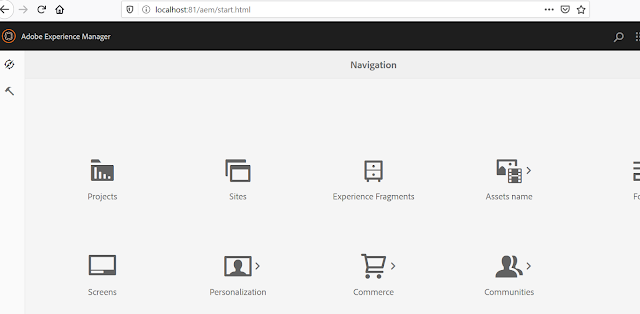
You will see, AEM instance is working on apache. I set up for the author. You can set port 4503 to publish.
Check http://localhost:81/editor.html/content/we-retail/us/en.html is working for you.

Congratulations!!! Your dispatcher is set up now.
RewriteRule ^/$ /content/we-retail.html [R]

RewriteRule ^/$ /content/we-retail.html [R] while setting up rules. So when you
hit loclahost:81 then it will automatically go to http://localhost:81/content/we-
retail.html

Congratulations!!!
Your rules also working now👍


