Sunday, June 4, 2023

What is JSON Web Tokens (JWT) and how to use?


Introduction:


Web authentication relied on cookies or sessions to authenticate users to web applications. These methods were good but had some drawbacks :

  • Scalability, 
  • Storage limitations, 
  • Difficulty in integrating with third-party services
JWT solved these issues by providing a simple, secure, and flexible way to authenticate users in web applications. Lets discuss first what is JWT?

As per https://jwt.io/

"JSON Web Tokens(JWT) are an open, industry standard RFC 7519 method for representing claims securely between two parties."

It is self-contained method for securely transmitting information between parties as a JSON object. JWTs are a good way of securely transmitting information between parties because they can be signed, which means you can be certain that the senders are who they say they are.

Anatomy of a JWT:


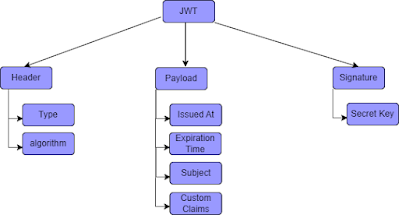
A JSON Web Token is essentially a long encoded text string. This string is composed of three smaller parts, separated by a dot sign. These parts are:

  • Header
  • Payload/Body
  • Signature


Anatomy of a JWT
Anatomy of JWT


Header:


The header contains metadata about the token. It has 2 parts:

type- JWT  
algo-  cryptographic algorithm used to sign it.

{ "alg": "HS256", "typ": "JWT" }

Encoing format: encoded in Base64Url format.

Payload:


The payload contains the claims or information about the user. Claims are statements about an entity (typically, the user) and additional data.

{
  "sub": "1234567890",
  "name": "John Doe",
  "iat": 1516239022
}

Encoing format: encoded in Base64Url format.

Signature:


The signature is used to verify the integrity of the message and to ensure that it has not been tampered with. The signature is created by encoding the header and payload, concatenating them with a dot, and then signing the resulting string with a secret key using a cryptographic algorithm such as HMAC or RSA.

JWT Structure

JWT Structure

JWT
<header>.<body>.<signature>

JWT claim Convention:

You may have noticed that in the JWT (that is issued by Google) example above, the JSON payload has non-obvious field names. They use subiataud and so on:

  • iss: The issuer of the token (in this case Google)
  • azp and aud: Client IDs issued by Google for your application. This way, Google knows which website is trying to use its sign in service, and the website knows that the JWT was issued specifically for them.
  • sub: The end user’s Google user ID
  • at_hash: The hash of the access token. The OAuth access token is different from the JWT in the sense that it’s an opaque token. The access token’s purpose is so that the client application can query Google to ask for more information about the signed in user.
  • email: The end user’s email ID
  • email_verified: Whether or not the user has verified their email.
  • iat: The time (in milliseconds since epoch) the JWT was created
  • exp: The time (in milliseconds since epoch) the JWT was created
  • nonce: Can be used by the client application to prevent replay attacks.
  • hd: The hosted G Suite domain of the user

JWT Authentication Flow:
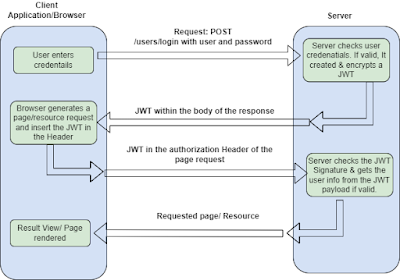

JWT Authentication Flow


Why we need JWT?


  • Secure: JWT is cryptographically signed, making it difficult to tamper with the token.
  • Stateless: JWT is stateless, meaning the server does not need to keep track of the user’s session. This makes it more scalable and less storage-intensive.
  • Third-party Integration: JWT can be easily integrated with third-party services like OAuth and OpenID Connect.
  • Cross-Domain: JWT can be used for cross-domain authentication because it can be sent as a HTTP Authorization header.
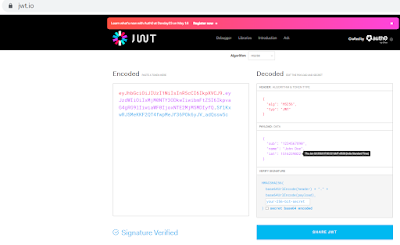
How do they work (using an example) ? Refer here


Happy coding!


Thursday, May 4, 2023

How to find Dedicated egress IP address in AEMaaCS


What is dedicated egress IP address?


Dedicated egress IP address allows requests from AEM as a Cloud Service to use a dedicated IP address, allowing the external services to filter incoming requests by this IP address.


How to find Dedicated egress IP address?

Obtain the dedicated egress IP address by using a DNS Resolver on the host: p{programId}.external.adobeaemcloud.com, or by running dig from the command line.

$ dig +short p{programId}.external.adobeaemcloud.com

You can also find Egress Ip using nslookup

$ nslookup p{programId}.external.adobeaemcloud.com

where programId you can find from your instance link. For eg you can find programId from this refreence url of your instance.

https://author-p<programID>-e<enviornmentId>.adobeaemcloud.com/aem/start.html


Note: Egress Ip is program Specific. It means it is same for all environments linked program.


Monday, November 28, 2022

What is Sitemap?


What is Sitemap?


An XML sitemap helps search engines easily navigate through your website content. It gives them a list of all your content in a machine-readable format.


An XML sitemap is a file that lists all your website content in an XML format, so search engines like Google can easily discover and index your content.

Today sitemaps are published in an XML format instead of HTML, and their target audience is search engines and not people.

Basically, an XML sitemap is a way for website owners to tell search engines about all the pages that exist on their website.

Below is example of sitemap: https://www.google.com/photos/sitemap.xml


https://www.google.com/photos/sitemap.xml


example:

<?xml version="1.0" encoding="UTF-8"?> <urlset xmlns="http://www.sitemaps.org/schemas/sitemap/0.9"> <url> <loc>https://www.google.com/intl/nl_nl/photos/printing/photo-books/</loc> <lastmod>2022-01-01</lastmod> </url> </urlset>

It consists of a below parts:

  • An XML version declaration: which search engine crawlers use to determine what type of file they are reading.
  • The URL set: tells search engines about the protocol.
  • The URL: lists the URL of the page.
  • Lastmod: a date format describing when the page was last modified.

Why we need Sitemap?

  • Sitemaps are extremely important from a search engine optimization (SEO) point of view.
  • Simply adding a sitemap does not affect search rankings. 
  • Sitemaps are equally as important for established popular websites as well. They allow you to highlight which part of your websites are more important, which parts are more frequently updated, etc, so search engines can visit and index your content accordingly.
Hope this helps!

How to create sitemap scheduler in AEM as cloud refer here.

SITEMAP | AEMaaCS


In this blog we can see how we can use Sitemap Scheduler approach in AEMaaCs to generate the sitemap.

As we need the Scheduler sitemap generation in publish mode we will go ahead and create a OSGI configuration in config.publish in our code repo.


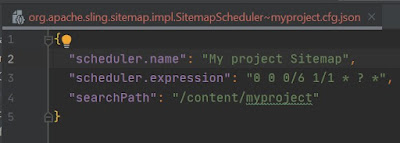
Create file cfg.json under config.publish to define the scheduler job for Sitemap (org.apache.sling.sitemap.impl.SitemapScheduler~myproject.cfg.json)


org.apache.sling.sitemap.impl.SitemapScheduler


What is sitemap? Refer here


Sunday, November 27, 2022

Sling RepoInit: Tool to Manage Content and Users in AEM | AEMaaCS

Setting up the initial state of AEM repository may appear cumbersome, we need to do lot of configurations and create system users and provide access to specific paths. Below are some of the items:

  • Creating service users
  • Creating user groups
  • Setting up ACLs/permissions for these users
  • Base content structure inside /conf or /content

Creating and setting up these configurations manually may lead to mistakes, and we have lot of environments development, QA, stage, prod etc. To overcome all these issues, Apache Sling Repository Initialization comes very handy.


How Repo Init works?

Repo Init is a set of instructions/scripts which help us in creating JCR structures, service users and groups. There are no explicit permissions needed in order to run these scripts. These scripts are executed early in the deployment process so that all required configuration/content exist in the system before the code is executed.


Configuring Repo Init:

To enable Repoinit, OSGi configuration for factory PID org.apache.sling.jcr.repoinit.RepositoryInitializer in one of the project’s configuration folders. Since it’s an OSGi configuration, it is easy to have a set of scripts for author and publish run modes, along with different environments such as Stage and Production. For example, config.author, config.publish, config.author.prod, and config.publish.stage, etc. use a descriptive name for the configuration like org.apache.sling.jcr.repoinit.RepositoryInitializer~init and config should be like”


org.apache.sling.jcr.repoinit.RepositoryInitializer-myprojectinit.config


These configurations have two optional fields:

·       A multi-value references field with each value providing the URL (as a String) of raw Repoinit statements

·       A multi-value scripts field with each value providing Repoinit statements as plain text in a String


Let’s create service user and provide some permissions:

scripts = “[

create service user my-service-user,

create path /conf/demo(nt:folder)/myconfig(sling:Folder),

set ACL for my-service-user;

allow jcr:read,rep:write on /conf/demo/myconfig;

end

]”

 It will create "my-service-user" system user and provide read & write permission to this user of path /conf/demo/myconfig.


Create service user user-1, user-2


scripts = “[

set ACL on /content/dam
    allow jcr:read for user-1,user-2
end

]”

  Service User – permission to multiple paths

    set ACL on /content/dam/myproject, /conf/myproject

         allow jcr:all for user-1

    end

"]

References:
https://sling.apache.org/documentation/bundles/repository-initialization.html

Happy Learning!

Thursday, October 13, 2022

AEM Cloud Service Available Regions


Below is the list of available environment in AEM Cloud:


The set of available regions will vary based on capacity and entitlements, so always check this list before creating an environment. The superset of possible regions are:


  • aus5 - Australia Southeast
  • can2 - Canada
  • deu6 - Germany
  • gbr9 - UK South
  • jpn4 - Japan
  • nld2 - West Europe
  • sgp5 - Singapore
  • va7 - East US
  • wa1 - West US


Reference:

https://developer.adobe.com/experience-cloud/cloud-manager/guides/api-usage/creating-programs-and-environments/

Friday, September 9, 2022

AEM Assets Brand Portal

 Product Overview

Adobe Experience Manager (AEM) Assets Brand Portal helps you easily acquire, control, and securely distribute approved creative assets to external parties and internal business users across devices. It helps improve the efficiency of asset sharing, accelerates the time-to-market for assets, and reduces the risk of non-compliance and unauthorized access.

Configure AEM Assets with Brand Portal

Follow adobe doc to configure Brand portal.


Adobe reference link 


Install yarn on windows

 In this article, we will see how we can install yarn on windows. First lets understand what yarn is? Yarn is an established open-source pac...